INSTRUCTIONS FOR USE
Thank you for purchasing a METEOR PISTON product. To achieve the maximum performance and ensure the proper operating life of the products, please follow the component general installation and operating instructions and the vehicle’s workshop handbooks or operation and maintenance manuals.
METEOR PISTON has over 70 years of experience, studies, develops and certifies internally all the technologies and the materials used for its products. METEOR PISTON manufactures entirely in ITALY: innovation, technology and quality are the development guidelines to ensure high performance and maximum reliability.
⚠ Caution: read carefully the general directions and warnings before starting to operate or use the products.
For any problems, warranty replacement or information related to METEOR PISTON products, please contact the official sales network.
GENERAL INSTRUCTIONS FOR CORRECT INSTALLATION
For the safety, efficiency, and reliability of METEOR PISTON products, the following instructions must be followed only by properly trained and qualified personnel when performing all inspection, monitoring, adjustment, disassembly and assembly of components.
Complete knowledge of the correct procedures, the specific skills, the proper preparation, and the application of general information and specific instructions are the necessary requirements for the proper operation of the products and to avoid failures, malfunctions, and breakdowns that can result in serious engine consequences or be the cause of accidents. It is therefore essential to follow the suggested procedures and operations carefully by using the correct equipment and performing the activities in the right order. In case of inadequate preparation or lack of requirements, it is necessary to entrust the installation and all operations for the implementation of the components to specialized technicians and qualified personnel.
⚠ Caution: the following includes general warnings and instructions for the proper installation of components: this is not an installation manual; it is necessary to refer to the guidance and instructions in the vehicle’s workshop handbook or operation and maintenance manual.
GENERAL SAFETY WARNINGS
Caution: do not modify the equipment supplied by METEOR PISTON in any way.
Caution: be sure that the vehicle engine is stopped before starting any work and do not restart it until all operations are completed to avoid injury or accidents from moving parts.
Caution: be sure that the engine, the exhaust systems, and all the components are cold before starting operation to avoid burns or contact injury.
Caution: keep out of reach of children and/or animals: products are not toys, danger of ingestion or accidental injury.
Caution: do not use the equipment in any way other than as indicated in the guidance and/or specific instructions or workshop handbooks.
Attention: always use the proper personal protection equipment.
Always follow the general installation instructions and safety warnings included in the vehicle’s workshop handbooks or operation and maintenance manuals.
GENERAL INFORMATION FOR USE
Before starting the installation of components be sure that they are suitable to vehicle manufacturer, model, and model-year.
Before starting the installation carefully check the compatibility of all products and make sure that all components are clean and have no anomalies, irregularities, or damaged parts.
Make sure that all components are properly installed before restarting the engine.
If after finishing all the operations, the vehicle does not start or the engine has irregularities in operation, make sure that all components have been properly installed. Repeat all installation operations if necessary.
⚠ Warning: do not reuse used components. Always use new genuine METEOR PISTON components. Do not use the components beyond their recommended operating life.
METEOR PISTON assumes no responsibility for any damage, injury or breakage resulting from the use of these products.
METEOR PISTON declines any responsibility for any improper use of the products, any operation carried out by unqualified personnel or for any use contrary to applicable standards and/or regulations.
METEOR PISTON reserves the right to change without any notice models, components, features, specifications and all data or information of its products.
PISTON INSTALLATION
METEOR PISTON pistons are designed to work under optimum conditions, for the specific application, within the recommended operating life and with piston-cylinder tolerances in accordance with the values given in the general installation instructions and vehicle’s workshop handbooks or operation and maintenance manuals.
In 4-STROKE engines, the use of METEOR PISTON pistons may require appropriate ECU (Engine Control Unit) tuning according to the technical specifications.
PISTON RING INSTALLATION
The proper installation of piston rings on the piston is necessary to ensure regular engine operations and all components operating life.
⚠ Attention: marking on the surface of the piston rings indicates the top direction; if not present, the piston ring may be installed in either direction.
⚠ Caution: always lubricate the whole surface of each piston ring with engine oil. Operate very carefully without overextending, deforming or damaging piston rings and/or piston grooves to avoid damage or abnormal wear of engine components, loss of performance, excessive consumption and/or oil loss.
⚠ Caution: operate very carefully not to nick, scratch or damage the piston top and/or the piston skirt. Do not use chrome-plated piston rings in chrome-plated cylinder bores to avoid damage to engine and components.
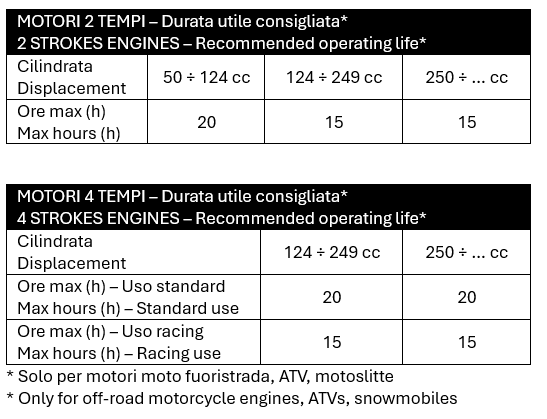
2 STROKES ENGINES – Installation instructions
The piston rings included in METEOR PISTON pistons are already supplied with the correct dimensions to ensure the distance between the ring tips: the piston rings do not require any modification or adaptation.
Proceed with the insertion of the piston ring into the corresponding piston groove by approaching one hollowed side of the tip to the piston ring retaining pin. In the case of pistons with multiple grooves, always start installation from the lowest groove.
Once the installation is complete, check that the piston rings can rotate freely and without impediments.
Make sure that the piston rings are properly installed by simulating cylinder closure: the countersinks on the ends of the piston ring must coincide with the piston ring retaining pin in the piston groove. Once the piston is installed on the connecting rod small end, before proceeding with insertion of the piston inside the cylinder, check that the piston rings are still aligned with the piston ring retaining pin.
⚠ Caution: the piston ring must never overlap the piston ring retaining pin in the piston groove.
4 STROKES ENGINES – Installation instructions
The piston rings included in METEOR PISTON pistons are already supplied with the correct dimensions to be installed: no modification or adjustment are required.
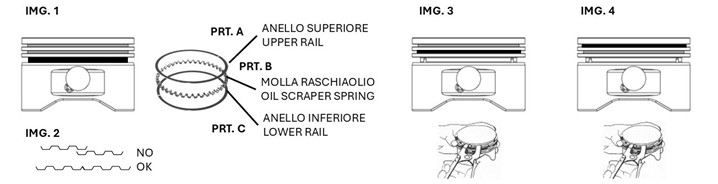
First assemble the oil scraper spring (IMG. 1 - PRT. B), then the lower rail (IMG. 1 - PRT. C) to be placed under the oil scraper spring, and finally the upper rail (IMG. 1 - PRT. A) to be placed above the oil scraper spring.
⚠ Caution: the ends of the oil scraper spring must not overlap either during assembling or during installation of the piston inside the cylinder (IMG. 2) to avoid damage or breakage resulting in abnormal oil consumption and excessive exhaust smoke.
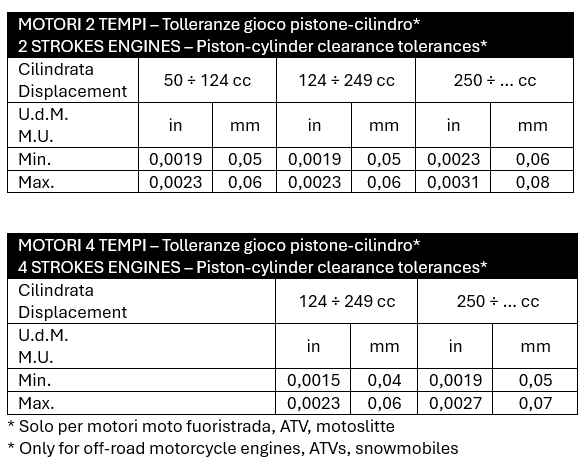
Proceed with the installation of the second piston ring in the second groove (IMG. 3). Proceed with the installation of the top piston ring in the top groove (IMG. 4). Skip this last step if the piston has only two grooves.
⚠ Caution: place the piston rings correctly, the closing lines of the piston rings must not be aligned to avoid gas leakage, loss of pressure in the combustion chamber and abnormal oil consumption.
After installation is complete, check that the piston rings can rotate freely and without any obstruction. Check that the piston rings are properly installed by simulating the closing of the cylinder: The tips of each piston ring have to meet without overlapping each other. Once the piston has been mounted on the connecting rod foot, check that the piston rings are still properly placed before proceeding to insert the piston inside the cylinder.
PIN RETAINING CLIPS INSTALLATION
Correct installation of the piston pins and pin retaining clips (pin retaining rings) is essential to prevent mechanical failures resulting in damages to components of the cylinder kit and/or to the entire engine.
⚠ Caution: operate very carefully without overextending, deforming or damaging the pin retaining clips. The pin retaining clips must not ever be closed with a diameter smaller than the diameter of the housing seat of the piston. If during assembly the clip tips reach the contact the clip will no longer be usable.
⚠ Caution: do not force insertion using inappropriate tools that could result in damage or breakage of the pin retaining clips, piston pin or piston.
Installation instructions
⚠ Caution: lubricate the outer surface of the piston pin and the inside of the piston pin seat with engine oil.
Proceed with the Installation of the pin retaining clip using the appropriate mounting tools, double-nose pliers in the case of SEEGER or specific tool for assembling in the case of PIN RETAINING CLIPS.
After completing the installation of the first pin retaining clip, check that the pin retaining clip is perfectly inserted in its seat.
⚠ Caution: the opening of the pin retaining clip tips must not be in correspondence of the opening near the piston pin seat to avoid slipping off and consequent serious engine damages.
Place the piston checking that the arrow marked on the top of the piston is pointing toward the exhaust.
Assembly the piston with the connecting rod foot by inserting the pin into the seat located in the piston and passing it through the previously lubricated needle bearing, when provided. Check that the piston pin and the piston are in the correct positions: the connecting rod position must be at 90° with the axis of the piston pin.
Install the second pin retaining clip following the same procedure as for the first pin retaining clip.
CYLINDER PREPARATION
Before installing the piston, be sure that the cylinder is free of any machining residue. Dry and lightly lubricate the cylinder with engine oil to prevent oxidation and facilitate the installation of the piston.
⚠️ Attention: the piston-cylinder clearance tolerances below are for guidance only and have to be checked according to vehicle’s workshop handbooks or operation and maintenance manuals.
⚠️ Caution: always use new gaskets for assembly.
⚠️ Attention: additional piston-cylinder clearance may be necessary for tuned engines. For installation of an oversized piston in place of the OEM (Original Equipment Manufacturer) piston an oversized gasket is recommended.
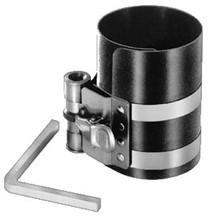
Use the appropriate tools to mount the piston inside the cylinder. Close the piston rings already mounted on the piston with the appropriate hose clamp pliers and slide the piston inside the cylinder bore while keeping the piston rings closed in the transition from the clamp to the bore.
CYLINDER HEAD INSERT INSTALLATION
Before starting the installation, carefully check all products for compatibility with vehicle brand, model and model-year, and ensure that all components are clean and have no abnormalities, irregularities or damaged parts.
⚠️ Caution: operate very carefully not to nick, scratch or damage the cylinder head insert. Clean carefully all the components and all the bearing surfaces and, if necessary, remove any residue.
Installation instructions
⚠️ Attention: the following includes general installation instructions; this is not a detailed manual.
Check the installation requirements, the squish values, the gasket dimensions, the compression values, the tightening torques, and the used fuel specifications before proceeding with the cylinder head insert replacement.
Remove the existing cylinder head insert.
Check the distance between the top of the cylinder to the top of the outer piston edge at Top Dead Center (TDC) and, if necessary, adjust the distance by installing different base gaskets other than the original ones.
Install the head o-rings and be sure that the dowel pins are in place and properly seated.
Install the head insert making sure that the inner o-rings sealing between the two parts are properly in place and not pinched. If necessary, lubricate the o-rings with engine oil.
Tighten the head nuts and bolts in a criss-cross pattern to the required tightening torque and the indications in according to the vehicle’s workshop handbooks or operation and maintenance manuals.
GASKETS INSTALLATION (TOP END)
⚠️ Caution: operate very carefully not to cut, scratch or damage the gaskets, the surfaces and the engine components.
Installation instructions
⚠️ Attention: the following includes general installation instructions; this is not a detailed manual.
Remove the cylinder head and proceed with the disassembly of the cylinder, piston and any other components.
Clean carefully all the components and all the surfaces before proceeding with any operations and properly lubricate the cylinder interior and the moving parts.
Replace the cylinder head gaskets and o-rings making sure they are all fitted in the correct position and direction.
Reassemble the piston and cylinder by tightening the nuts and bolts on the head according to the tightening torque and the indications in vehicle’s workshop handbooks or operation and maintenance manuals.
GENERAL RUNNING-IN INDICATIONS
The running-in phase is essential for proper engine operation, for component adaptation and for settling of moving parts. During the running-in phase, it is recommended to run at low RPMs (revolutions per minute) without pushing the engine to high RPMs and to avoid sudden acceleration and/or deceleration.
⚠️ WARNING: The information in this document may contain typographical errors, inaccuracies, or information prior to any changes made.